Hi -
I'm glad the Arch Linux live USB is working for you ^-^
However, I realized afterwards that my comment:
I've just got a simple [ownCloud] system up and running on my B3 here with Arch, took about 30 minutes end to end.
might not have been
particularly helpful ><
So, here's a quick
step by step guide to getting a simple OwnCloud 8 system up and running on your B3 under Arch. There's lots that could be done to improve it from a stability, security and performance perspective, but it should be enough to get you started.
OK, begin by downloading, configuring and booting the current Arch Linux live USB. I know you've already done this with the 1.0.0 release, but I would recommend you start from the newly released 1.1.2 version (available
here), as this lets you update your kernel, as well as userspace packages, from archlinuxarm (which means you can keep
everything on your B3 up to date going forward, without any further releases or updates from me).
Once your B3 is up, from a PC on the same subnet, log into it as root, via ssh, per the instructions (on the project's
GitHub page).
OK. Now the first thing we need to do is a full system update (to avoid issues with
'partial upgrades'). Issue:
Code: Select all
[root@archb3 ~] pacman -Syu
  (confirm when prompted)
If this warns you that your kernel (linux-kirkwood-dt) has been upgraded, then when the process completes, power down your B3 (press and hold the rear button for 5 seconds, then wait for the light to go out), and then reboot from the live USB, so that you are running the newly updated kernel. Log in again via ssh. If your kernel didn't need to be updated, however, just keep going, there's no need to reboot.
Next, we'll load all the necessary packages (LAMP stack, owncloud etc.). I'm going to assume in the following that you want to use apache (2) as the web server, sqlite as the database, and that you need a self-signed certificate for HTTPS. Obviously, adapt as necessary (use
this Arch Linux wiki page to guide you if you want to make changes). Issue:
Code: Select all
[root@archb3 ~] pacman -S owncloud php-intl php-mcrypt sqlite php-sqlite apache php-apache php-apcu
  (confirm when prompted)
Now we need to set up the various configuration files. First, php. Issue:
Code: Select all
[root@archb3 ~] nano -w /etc/php/php.ini
and
uncomment (by removing the leading semicolon) the following lines in the file (leaving the other lines in the file unchanged):
Code: Select all
extension=bz2.so
extension=gd.so
extension=iconv.so
extension=intl.so
extension=mcrypt.so
zend_extension=opcache.so
extension=openssl.so
extension=pdo_sqlite.so
extension=sqlite3.so
extension=xmlrpc.so
extension=zip.so
Save and exit nano.
Next, ensure data caching is on. Issue:
Code: Select all
[root@archb3 ~] nano -w /etc/php/conf.d/apcu.ini
and
uncomment the following line so it reads:
Save and exit nano.
Next, copy the provided baseline ownCloud 8 server configuration into place:
Code: Select all
[root@archb3 ~] cp /etc/webapps/owncloud/apache.example.conf /etc/httpd/conf/extra/owncloud.conf
Next, we'll want to modify this so that it can service https requests. Issue:
Code: Select all
[root@archb3 ~] nano -w /etc/httpd/conf/extra/owncloud.conf
and
add the following lines to the end of the file:
Code: Select all
<VirtualHost 192.168.1.129:443>
    ServerName foofarm.com:443
    SSLEngine on
    SSLCertificateFile /etc/httpd/conf/server.crt
    SSLCertificateKeyFile /etc/httpd/conf/server.key
    ServerAdmin [email protected]
    DocumentRoot /usr/share/webapps/owncloud
    ErrorLog /var/log/httpd/owncloud.foo.info-error_log
    CustomLog /var/log/httpd/owncloud.foo.info-access_log common
</VirtualHost>
Obviously, if you have changed the wan (eth0) address of your B3 from 192.168.1.129, substitute this in the above.
Also, if you have a real name (for example, myserver.com), subsitute this for 'foofarm.com' (and you can also change the port 80 VirtualHost data above in the file too, if you like). If you are just testing locally, the above will work fine (provided only that the IP address is correct).
When done, save and exit nano.
We don't have a self-signed certificate yet for the site, so let's generate that now (per
these Arch Linux notes). Issue:
Code: Select all
[root@archb3 ~] pushd /etc/httpd/conf
[root@archb3 conf] openssl genpkey -algorithm RSA -pkeyopt rsa_keygen_bits:2048 -out server.key
[root@archb3 conf] chmod 600 server.key
[root@archb3 conf] openssl req -new -sha256 -key server.key -out server.csr
Here, you will be prompted to enter various fields. For a test system, it really doesn't matter what you put, but in a production system, you'd need to ensure at least that Common Name matches your domain name; also, be sure to just leave the challenge password blank when asked for it, or else your certificate won't be usable by apache. See e.g.
these notes for more details.
With that done, continue as follows:
Code: Select all
[root@archb3 conf] openssl x509 -req -days 365 -in server.csr -signkey server.key -out server.crt
[root@archb3 conf] popd
Now we can set up apache's configuration file appropriately.
Issue:
Code: Select all
[root@archb3 ~] nano -w /etc/httpd/conf/httpd.conf
and
uncomment the following lines (remove the leading #, in this case), so they read:
Code: Select all
LoadModule socache_shmcb_module modules/mod_socache_shmcb.socode
LoadModule ssl_module modules/mod_ssl.so
LoadModule rewrite_module modules/mod_rewrite.so
Include conf/extra/httpd-ssl.conf
Still in this file, deselect the 'mpm_event_module', by
commenting out the relevant line so it reads:
Code: Select all
#LoadModule mpm_event_module modules/mod_mpm_event.so
then
add the following line afterwards, so you now have:
Code: Select all
#LoadModule mpm_event_module modules/mod_mpm_event.so
LoadModule mpm_prefork_module modules/mod_mpm_prefork.so
Finally, scroll down to the end of the file, and
add the following lines:
Code: Select all
#
# PHP is an HTML-embedded scripting language which attempts to make it
# easy for developers to write dynamically generated webpages.
#
<IfModule prefork.c>
  LoadModule php5_module modules/libphp5.so
</IfModule>
<IfModule worker.c>
  LoadModule php5_module modules/libphp5-zts.so
</IfModule>

Include conf/extra/owncloud.conf
Include conf/extra/php5_module.conf
Leave the rest of the file as-is. Save and exit nano.
Nearly there! We next have to ensure that we have at least one of the locales that ownCloud requires. Issue:
Code: Select all
[root@archb3 ~] nano -w /etc/locale.gen
and
uncomment the following line (remove the leading #), so it reads:
Save and exit nano.
Then issue:
Next, we need to make sure that ownCloud has appropriate access rights; issue:
Code: Select all
[root@archb3 ~] chown -R http:http /usr/share/webapps/owncloud/
And that's it, ready to try it out! Start apache:
Code: Select all
[root@archb3 ~] systemctl start httpd
If that completes without errors (it should), then on the PC on which you have ssh'd into your B3, open a web browser, and navigate to "
https://192.168.1.129" (obviously, if you have used a different address for your B3's wan port, use that instead here). Your web browser will probably issue some sort of security warning at this point, stating the certificate does not match the address, is self-signed etc., which of course is true, as we just generated it with spurious data (of course, if you used a real certificate, rather than generating it, then you won't get any warnings). Allow your browser to continue to the site (you may need to add a security exception, if using Firefox - you'll be prompted to do this). Ensure that javascript is enabled in your web browser too, since ownCloud needs it.
OK, you should then get to an initial setup page visible in your browser, something like the below (incidentally, in case of problems with https, you can navigate to the unsecured page, "
http://192.168.1.129", which should also work):
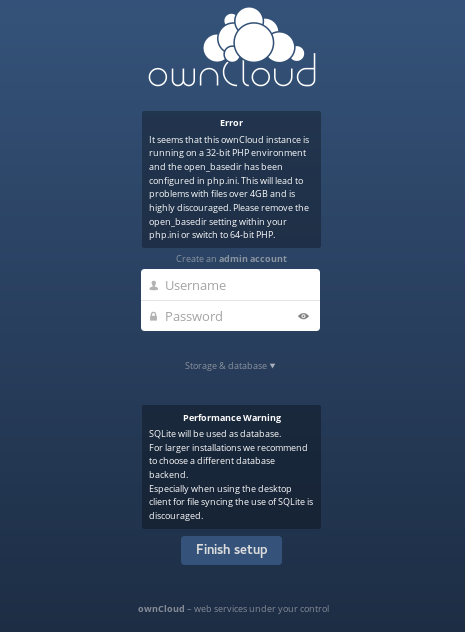
You can (apparently) ignore the 'error' about 32-bit php: see
this post for example.
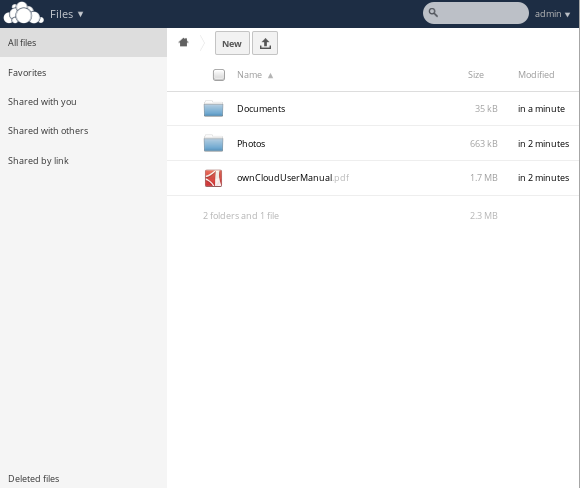
Enter a username and password, and click on 'Finish setup'. ownCloud will do its stuff for a bit, and after that, you should be in:
That's it. Obviously, in a production system, you'd want to set up a firewall, put the thing in a container or at least a chroot, take more care with your VirtualHosts etc etc. But hopefully this gives you the pointers you need to get started.
PS if you want your web server (and ownCloud) to come up automatically after a reboot, remember to issue:
Code: Select all
[root@archb3 ~] systemctl enable httpd
Also, if you get the system working as you like it on the live-USB, and want to install it to your hard drive, you can do so easily (simply follow
these instructions on the GitHub page). All the configuration work you have done will be copied over to the HDD.
Finally, if you'd like to change your hostname, you can do so now. For example, to change it to "hana" (and reflect the change immediately), issue:
Code: Select all
[root@archb3 ~]# hostnamectl set-hostname hana
[root@archb3 ~]# exec bash --login
[root@hana ~]#
Best,
sakaki
PS I have verified that this works end-to-end on a fresh 1.1.2 live-USB image. It took 28 minutes (including the initial pacman -Syu) but ymmv, depending on your network speed etc.
Edited to reflect how to set hostname, as requested (this is also now in the live-USB's instructions on GitHub).